
With the rising cost of living affecting everyone, a car service can seem like an unnecessary extra pay out to make. However, servicing your car can be essential to preventing damage and breakdowns further down the line as well as leaving you to feel confident that your car is safe, in good shape and not going to break down.
The good news is – yes, you can service your car yourself to save money. But before you read on to find out how with our step by step guide to servicing your own car, you need to know what a service is, what it involves, how often it should be done and why you need to do it!
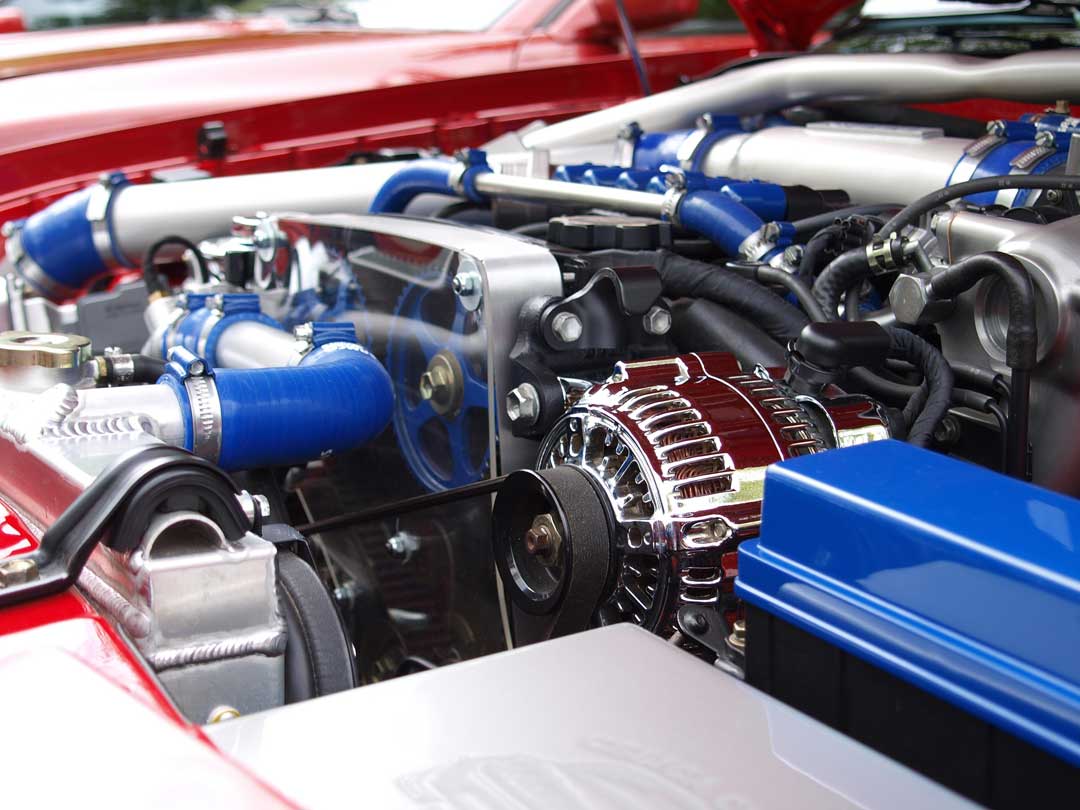
Types of car service
A service isn’t a legal requirement, unlike an MOT, but servicing looks at the wear and tear on your car and helps keep your car performing at its best. Servicing is usually carried out either periodically (every six months to two years) or based on your mileage so car vary over the course of your car’s lifespan. When buying a new car you should also receive the service history log with it so that you can check whether your new car has been regularly serviced.
The car manufacturer will detail which checks should be carried out in a service in the owner manual although every garage may be slightly different in what they offer as part of a service so do check with the garage when you book in. Below is an overview of what is carried out in the different types of car service.
Interim service
An interim service is recommended every six months or 6000 miles (whichever comes first). All services will include checking lights, brakes, tyres, steering, suspension and all fluid levels. An interim service might also include an oil change, oil filter replacement and drive belt inspection. Interim services are recommended for those with high mileage or who undertake lots of short journeys.
Full service
A full service is recommended every year or every 12,000 miles (whichever comes first). It can include up to 80 checks on your vehicle! This includes everything from the interim service as well as fuel filter replacement (for diesel cars), air cleaner replacement, alternator and vacuum hose checks, parking brake shoes inspection and rotation of the wheels.
Major service
You should take your car for a major service after around 24,000 miles or around 2 years. This will include everything in a full service as well as spark plug replacement, brake fluid replacement, automatic transmission oil level inspection and a full battery test.
Manufacturer’s service
At Peverell garage we also provide a manufacturer’s service package, designed to uphold your car manufacturer’s warranty. We have access to service database systems in order to stick to your regular dealership service schedule and can carry out any necessary work or car repairs.
If you don’t fancy the hassle of undertaking car servicing by yourself, your local garage (that’s us if you’re in Plymouth!) will be more than happy to help. This blog will give you a good overview of some of the key checks carried out in a full car service as well as all the tools you need to be able to do it yourself. Keep an eye out for our monthly blogs which will go into even more detail about how to carry out each of these essential jobs.
Checking, topping up and changing your car fluid levels yourself
Any car service will include a check of the levels of all of the fluids in your car, with a top up if necessary. You may want to note that this doesn’t include a fuel top up though! Checking the levels of fluids in your car is really easy with our quick how-to guides below. Remember that to read fluid levels correctly you should be parked on a flat surface, if any of the fluid levels are low, top them up then re-check the following day and following week to make sure that it wasn’t due to a leak.
Check your brake fluid levels
Keeping your brake fluid topped up is vital to the correct functioning of the braking system on your car.
- Drive your car for a short amount of time, braking lots to fill the braking system with brake fluid.
- Find the brake fluid reservoir under the bonnet and check the fluid is between the minimum and maximum markers.
- If it is low, top up the brake fluid before replacing the lid of the reservoir. If the fluid is high you may need to replace the brake fluid – this can easily be done by us at your local garage.
Check your power steering fluid levels

Your power steering fluid is easily checked when servicing your car yourself by looking at the correct reservoir under the bonnet – it will have either the words ‘power steering’ or a picture of a steering wheel on the cap. Check the level of the fluid is between the minimum and maximum markers on the outside of the reservoir or using the dipstick depending on what set up your car has and top it up if it is low – simple!
You must make sure the power steering fluid you use is the correct one for your car by looking in the owner manual or contacting the manufacturer. At a garage the mechanics will also check the colour and clarity of your power steering fluid to assess for contamination or oxidation and will replace it if needs be.
Check and replace your antifreeze or engine coolant
First of all, you need to know that engine coolant is a ready-mixed anti-freeze solution that you can readily buy, you can also purchase antifreeze as a concentrate and dilute it yourself at home – a general rule is to dilute it 50/50 with distilled water. You also need to make sure you use the correct antifreeze for your car make and model to prevent damage to the engine.
You can find the engine coolant reservoir under the bonnet and the level can be easily checked by eye. If it is low you run the risk of your engine overheating as well as creating a build up of internal rust. Be sure to investigate if there is a sudden drop in coolant level as there may be a leak somewhere. In which case you will likely need to bring your car to us for further tests.
To top up your engine coolant wait until your engine is cold, unscrew the cap of the reservoir (this can be located using your owner manual if you are unsure but often the fluorescent pink, blue or purple, coolant is easy to identify) and fill to the maximum line on the outside of the tank. Ensure there are no leaks before driving off.
Check and top up your screen wash

Did you know that an empty windscreen wash will cause your car to fail its MOT? That’s how essential having a clear windscreen is, so it is vital that you regularly top up your screen wash reservoir and not wait for it to be done at your annual service. There are a multitude of products out there for you to choose from; from concentrated solutions, to ready-to-use formulations, even scented options too!
- Dilute your screen wash if needs be into a suitable container (not one used for food or drink).
- Locate the screen wash reservoir under your car’s bonnet.
- Open the lid of the reservoir and insert a funnel to avoid spillages.
- Pour in your screen wash until the reservoir is full.
- Replace the cap and you are done!
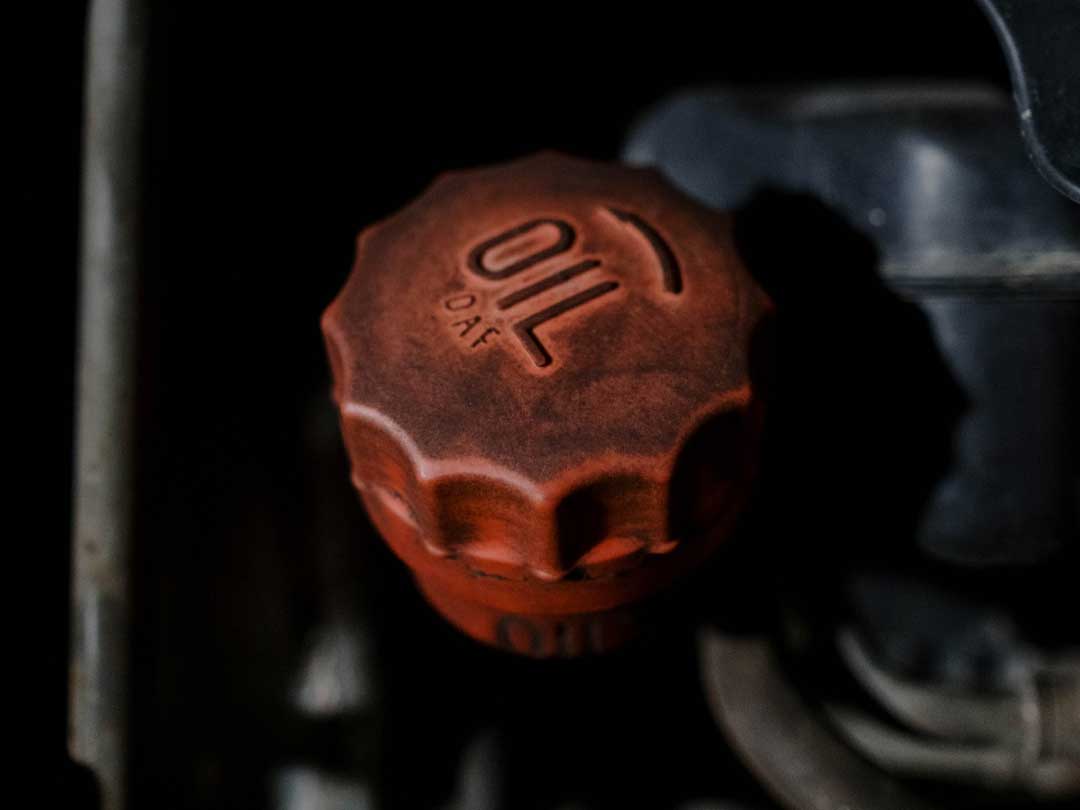
Check and replace your engine oil and oil filter
How to check your car engine oil level
Regardless of whether you are servicing your car yourself or taking it to a garage, checking the engine oil level regularly is something every vehicle owner should do as standard regular vehicle maintenance and it’s incredibly simple to do.
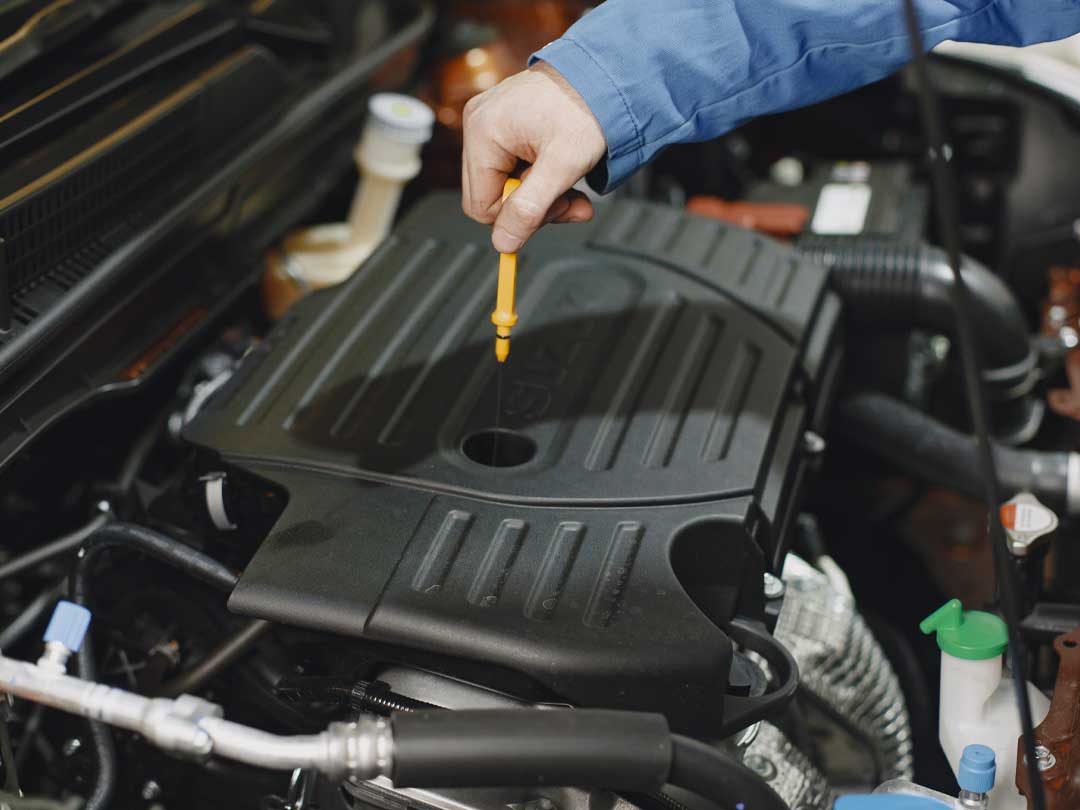
- To check your engine oil level locate the dipstick under the bonnet (usually a yellow plastic loop in most cars).
- Remove the dipstick then wipe clean of engine oil with an old rag or tissue.
- Re-insert the dipstick then remove and look at the end, the oil level should sit between the minimum and maximum.
- If the engine oil level is low you will need to top it up by locating the oil reservoir cap, remove the cap and pour in fresh oil before re-checking your oil level.
- If there is an obvious engine oil leak please bring your car to us at Peverell garage to investigate further.
How to change your car oil filter

Be prepared, if you are changing your oil filter when you service your car you will need to replace the oil too so ensure you have both the correct replacement oil filter and oil before starting.
- Before changing your oil filter you will need to warm your engine slightly by running your car for a couple of minutes.
- Wear gloves to protect your hands from the oil and place a bucket underneath the oil sump to collect the old oil as it drains.
- Use a wrench to loosen the sump plug before removing it by hand and allowing the old oil to drain before re-tightening the sump plug.
- Use an oil filter wrench to remove the old oil filter, be sure to dispose of your oil filter and the old oil responsibly, you can find your local engine oil bank using this government website.
- Use a little of the new oil to lubricate the new oil filter Sealing ring before tightening it in place by hand or to the correct torque.
- Top up your oil under the bonnet then start the engine to check for any issues and re-check the oil level.
Checking and replacing your bulbs

Checking your vehicle bulbs is probably the easiest task on the service list that can easily be carried out on your driveway, although you need a friend or family member to help you check your brake and reverse lights!
To change a vehicle bulb you will just need a screwdriver to unscrew the lighting housing and bulb holder but may have to remove some cosmetic covers on your vehicle to get to this first. Just make sure you have ordered the correct bulbs for your make and model vehicle.
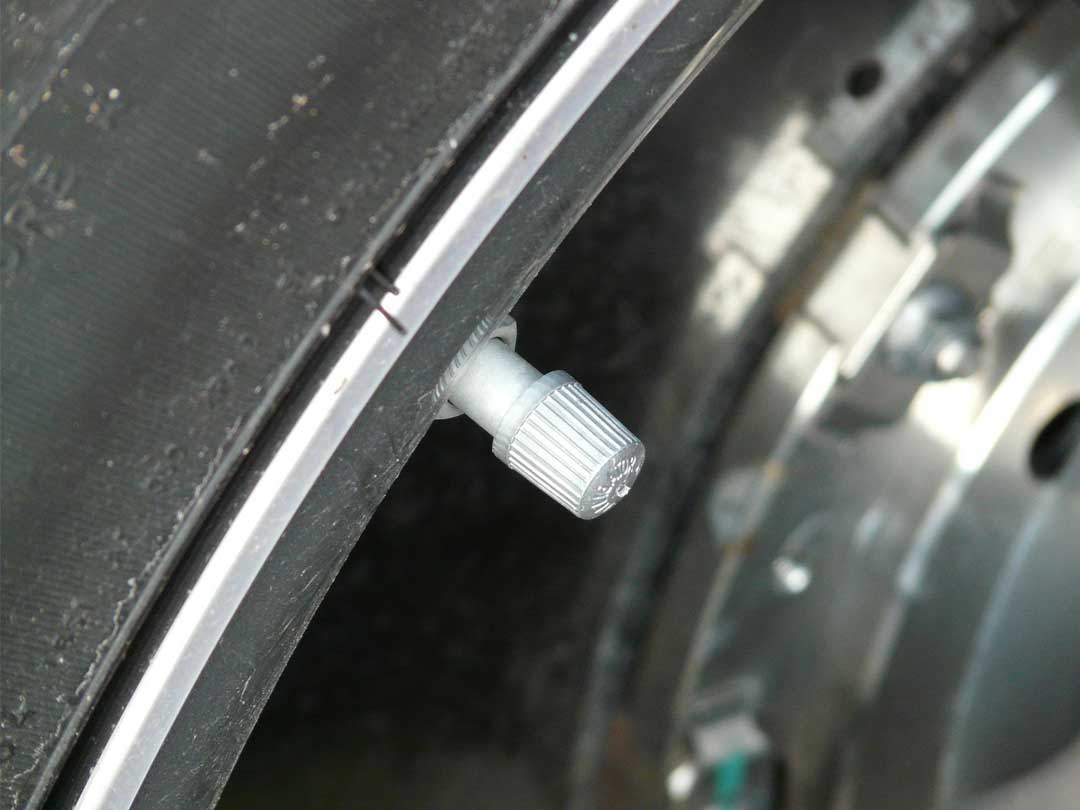
Checking your tyre pressure and tyre condition
Your tyres are checked as part of your MOT but it is important their pressure and condition are also checked as part of a car service. You can easily check your tyre pressure using a tyre pressure gauge but most garages will have a tyre air pump that will indicate the tyre pressure as well as being able to top up the air there and then. Just remember to remove and then replace the dust caps that sit over the tyre valves before and after pumping up your tyres or checking the pressure. Your ideal tyre pressure for each wheel will be outlined in your car manual and likely also on the pillar of your car door.
Incorrect tyre pressure can also impact tyre condition, you need to check the tread on your tyres as part of your DIY car service. This requires only minimal equipment in the form of a depth gauge. Tyres begin life with around 8mm depth on the tread, the legal limit is 1.6mm but tyres should be changed before they reach this level – another job for your trusted local garage who have all the specialist tools.
DIY tyre rotation
If you want to service your car properly then, for most cars, you might need to rotate your tyres so that they wear more evenly. However, it is recommended that the ‘best’ tyres be fitted at the rear of your car as it’s far more dangerous if a rear tyre suddenly deflates as this is most likely to cause loss of control of the car. Check your tread and tyre condition before deciding whether you need to rotate your tyres or if you need new tyres.
Remember that you will need to make sure you have a car jack and supports in place in order to be able to remove more than one wheel.
Checking and changing your windscreen wiper blades
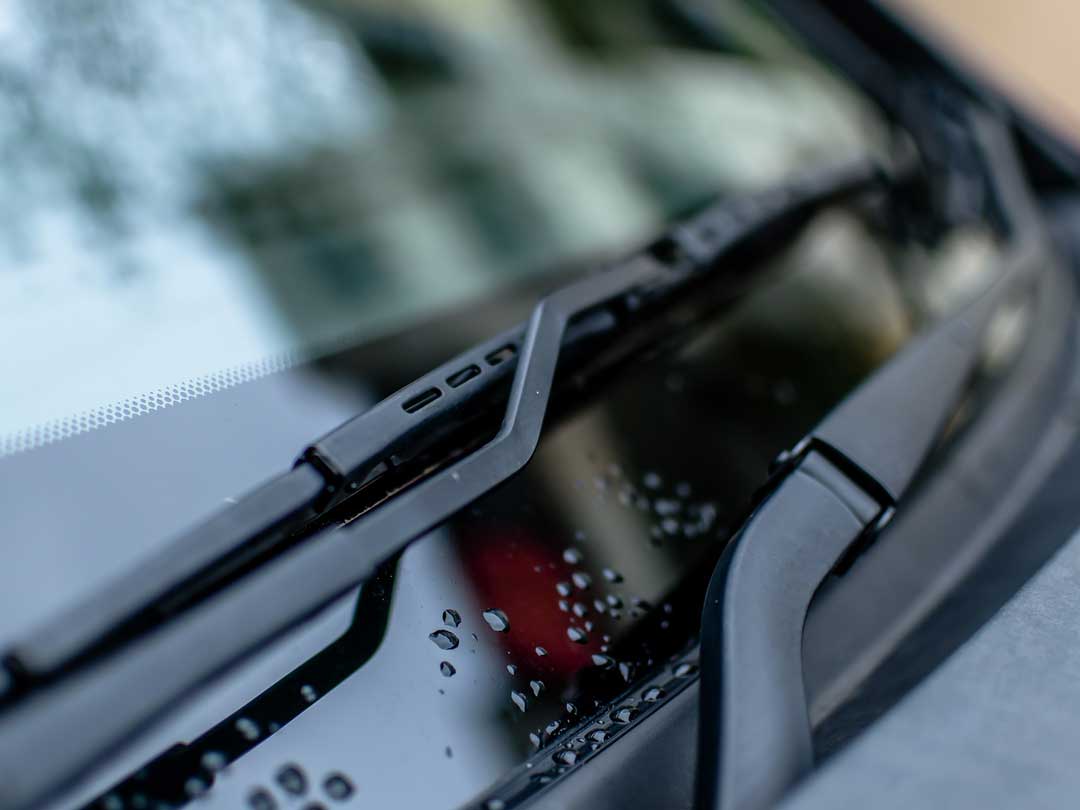
Checking and changing your windscreen wiper blades forms a key part of any car service but is easy to do yourself and requires no specialist tools. Before beginning make sure you buy the correct replacement wiper blades from a reputable car parts stockist that fit the make and model of your car. Lift the windscreen wipers away from the windscreen and unclip the old wiper blades, clip in the new wiper blades and lower the windscreen wipers again.
Servicing your air filter
When doing a DIY car service there are some jobs that are much easier than others and checking and/or changing your air filter is one of them, particularly as you need hardly any tools for the job!
- Find your air filter under the bonnet on top of your engine, it will be in a box.
- Unclip the cover to remove the air filter.
- Knock the air filter gently on a hard service to remove any dust and debris. If your air filter is particularly dirty it is time for a new air filter.
- If your air filter is not excessively dirty then give it a quick but gentle vacuum, along with the casing, be careful not to get any of the dust and debris in the engine.
- Replace the air filter and casing and you are done.
Ok, so we’ve covered the basic, key and easy jobs when servicing your own car that you can do with a basic set of tools and vehicle knowledge. Now it’s time to get a few more tools out… or contact us to help out!
Checking your spark plugs (petrol cars)
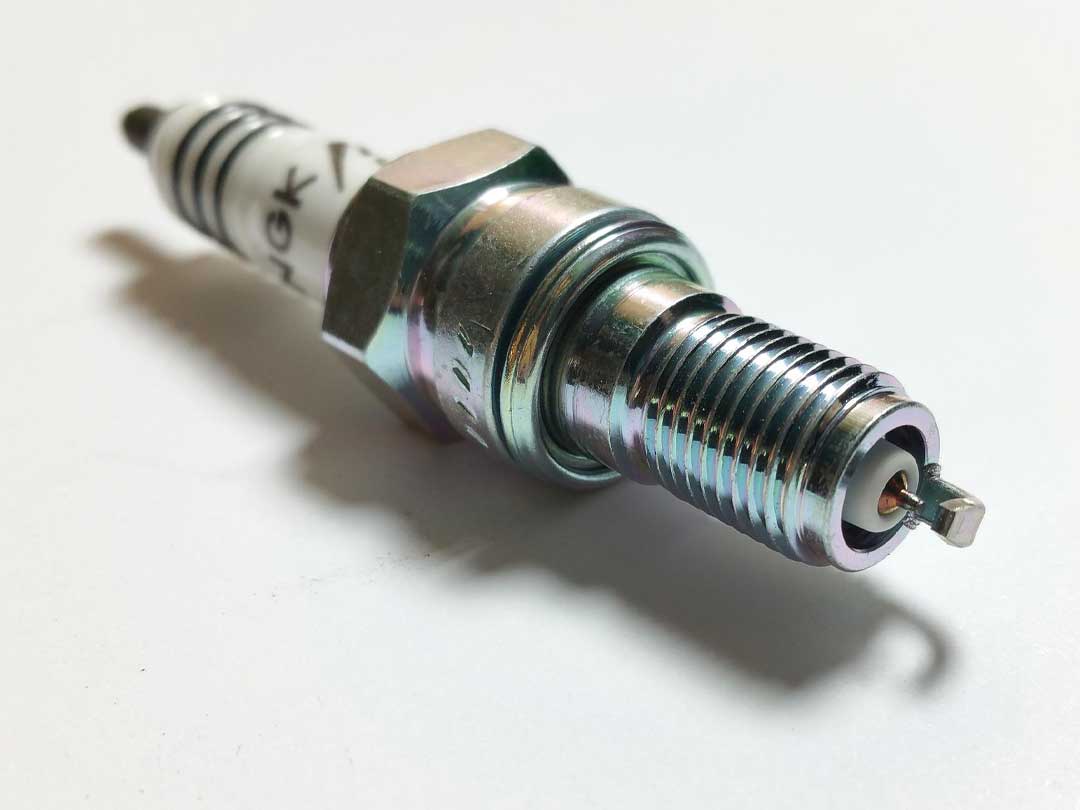
Spark plugs are what cause the spark to ignite the fuel in petrol cars, damage or wear to your car’s spark plugs can lead to difficulties starting the engine and cause reduced fuel efficiency and engine performance. Spark plugs only need to be replaced every 40 – 60,000 miles (or earlier if damaged or in modern cars) but cleaning and checking them is a regular part of any car service.
- Ensure the engine is turned off and is cold before starting to check or change your spark plugs.
- Under the bonnet, use a wrench to disconnect cable from the negative terminal of the battery for safety measures and remove any casing on top of the engine that is protecting the spark plugs. The spark plugs are usually located on the top or side of the engine head but your owners manual will clearly state this, along with how many spark plugs you need – most vehicles have four.
- Remove the spark plug caps (also known as ignition coil electrical connectors) and check each one for damage, labelling each as you go so that you know where to put them back.
- Clean the area around the spark plugs to prevent debris going into the cylinder before removing the plugs.
- Remove the old spark plugs using a spark plug extension and socket set, gripping each one as close to the base as possible and pulling gently in an anti-clockwise motion to prevent damage. If you see any evidence of damage, burning or any white build up around the electrodes it is essential that you replace the spark plugs.
- If replacing spark plugs it is important to replace all of them at the same time for optimal engine performance.
- You may want to clean each plug and lubricate with a small amount of anti-seize lubricant to make them easier to check/change at a later date. Once lubricated insert the spark plugs into the cylinder and tighten either by hand or a torque wrench.
- Replace the ignition coil electrical connectors, any plastic you removed and reconnect the battery cable before closing the bonnet. Your first job is done!
Checking your glow plugs (diesel cars)
Diesel engines don’t require the spark made by spark plugs to ignite the fuel to start the engine, instead they have glow plugs which heat the fuel so that it can be combusted. Maintaining your glow plugs in good condition significantly reduces exhaust gases emitted from your vehicle which can go on to contribute to global warming. Diesel engines have one plug per cylinder meaning they use up to 10 glow plugs, as well as wearing with age cold weather can impact the lifespan of your glow plugs.
- Under the bonnet use a wrench to disconnect the battery cable. This is an essential safety precaution.
- You may have to remove some plastic casing protecting the glow plugs by unscrewing any retaining screws before removing the valve cover.
- Glow plug wires should be disconnected using pliers before removing the plugs themselves with a socket and ratchet anti-clockwise.
- Check the condition of the glow plug, if it has deteriorated be sure to remove any broken pieces from the engine.
- Re-insert the old plugs (or insert new plugs) using a wrench to tighten. Do not overtighten as this may cause damage to the plugs.
- Finally, reconnect the glow plug wires and reattach the valve cover and engine cover before reconnecting the battery and starting the engine to check your work. Be sure to check your user manual for specific torque pressures when reattaching the valve cover. Your first DIY car servicing job is complete!
Checking and changing brake pads
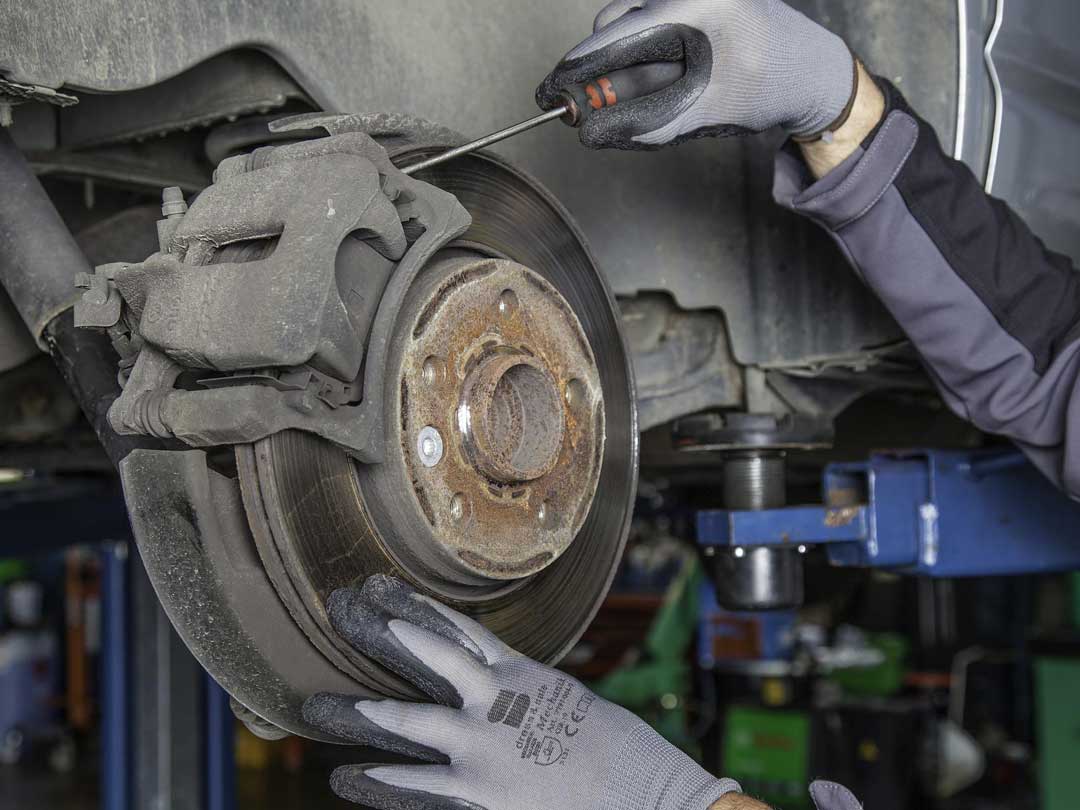
Keeping your brake pads in good condition is essential for safe and even braking, only undertake work on your car’s braking system if you are competent to do so as and any wrong doing can lead to brake failure and cause an accident. Please contact us at Peverell garage if you do not feel confident in checking or changing your brake pads, we will be more than happy to help.
- Raise your car on jack stands, using your manual to identify the correct place for the jack to be placed and ensure the car is correctly supported and stable to avoid serious injury.
- Once raised, use a lug wrench to remove the lug nuts on one of the wheels, removing the bottom nuts first. Once complete, take the wheel off.
- Check the caliper pressure for a small amount of movement before removing the caliper bolts using the correct sized spanner or socket. These will be located inside the stud axle housing where the wheel fits into the axle. Be sure to remove any washers and keep them safe.
- Once loose, hang the caliper on the wheel well using bungee cord or string to avoid putting pressure on the brake hose. You should now have access to the brake pads.
- Unclip the old brake pads and examine for damage (warping, scores or cracks), they may require loosening with a hammer beforehand.
- Insert the new brake pads (if required) with new clips if provided, applying anti seize lubricant to the backs of the pads and any other contact edges. DO NOT get any lubricant on the inside of the brake pads and this will render your brakes useless and potentially cause an accident.
- Use a C-clamp to retract the pistons, this will cause the brake fluid in the pistons to move back into the master reservoir and brake fluid level will increase, this is the perfect time to check your brake fluid level under the bonnet and top it up if necessary.
- Replace caliper by sliding it back over the brake pads then re-tighten the caliper bolts and reattach the wheel to the torque specified in your owner manual. If the caliper doesn’t slide easily over the brake pads check that you have properly retracted the piston.
- Remove the jack stands to lower the vehicle then check your brakes. Pump the brake pedal 20 times then test your brakes at gradually increasing speeds. Should you hear a grinding metallic sound you may have put the brake pads in upside down which needs to be resolved immediately.
- Repeat steps 1-9 for the next set of brake pads.
Checking and replacing your fuel filter (petrol + diesel cars)
The purpose of your fuel filter is to trap dirt, rust and debris present in your fuel tank and prevent these entering your engine, whilst some petrol cars have fuel filters fit for the lifespan of the car, the fuel filter will need replacing every two years on most petrol and diesel cars. Having a clogged fuel filter can impact how well fuel gets into the engine, it may cause your engine to splutter or misfire, it may just sound rough when idle or you might break down completely.
You may be able to change the fuel filter yourself as part of your DIY car service, but contaminants that get through a clogged filter can damage or cause leaking from the fuel injector – something that needs to be flushed by a professional at garage. Please contact us if you think this might be the case, or read on if you’ve got the right tools and mechanical know-how to replace the fuel filter yourself. It’s also worth noting that some modern cars don’t have accessible fuel filters so check your owner manual before you begin.
- Firstly, on a petrol engine make sure the engine is cold and relieve the pressure inside the fuel pump by locating and unplugging the fuse. You can check you have unplugged the right component as the engine will turn over but not start or, if it does start, will cut out shortly afterwards.
- Locate your fuel filter, this is likely underneath your vehicle so you will need to have it on ramps. Wear eye protection in case any fuel squirts out and have a fire extinguisher handy in case the fuel ignites.
- Put a bucket or something to collect the fuel in underneath the fuel filter.
- Remove the fuel lines (tubes) that are connected to either end of the filter, you may need pliers to help remove the retaining clips.
- Loosen the bolts holding the filter in place then remove the filter and place to one side.
- Install the new fuel filter ensuring you have it the correct way round, fuel will only flow one way through the filter.
- Reconnect the fuel lines, replace the retaining clips and re-connect the fuse you disconnected. On a diesel engine you will need to prime the system, this removes any air bubbles within the lines. Locate the primer or bleed screw and refill the system with diesel, the location can be found in the owners manual.
- Start the car to make sure it is working and that there are no leaks coming from the new filter.
Servicing your car’s timing belt yourself
The timing belt (also known as a cambelt) is a tricky one to do as part of a DIY car service and a key component to have working correctly, this will only be done as part of a major service or if you are having problems. Once removed an old timing belt should never be re-installed so checking the timing belt usually comes hand in hand with changing it. Quite often, there are other parts that will need replacing alongside your timing belt and tension values must always be calculated on a new belt when fitted.
This is definitely a job for your trusted local garage as many people do not have the right tools or mechanical knowhow, so give us a call if you notice any of the following; the engine misfiring, an engine oil leak, ticking noise when running, struggling to accelerate, particularly at high a RPM.
Things to remember if servicing your car yourself
A car service is key to keeping your vehicle in good working order, reducing the likelihood of breakdowns and getting a garage to carry out your car service means the mechanics may spot other problems and carry out repairs whilst the car is at the garage that you might not have yet noticed. Unless you are a trained mechanic, only carry out work and repairs on your own car.
Be sure to get your car parts for your DIY car service from a trusted supplier. You might save money but used car parts may not be adequate or in good enough condition. At Peverell Garage we source our car parts from well known stockists and all parts come with a guarantee in case anything goes wrong.
Although DIY car servicing may save you some money, it may impact your service history as you won’t get the garage stamp in your service book. In turn this may affect the value of your vehicle should you try to sell it without a full documented service history.
Do remember that every vehicle is different so these instructions may not suit all vehicles. Moreover, a lot can go wrong if you are inexperienced or lack the correct tools – from permanent damage to the car to injuring yourself or someone else.
If you are unsure on how to carry out servicing on your car, or you lack the correct tools simply bring your car to us at Peverell Garage for car servicing. We are a friendly-run garage located close to Plymouth city centre in Peverell. Our car mechanics are fully trained in a huge range of vehicle types, have many years experience under the bonnet and are used to carrying out all of these jobs as part of a car service, as well as any other repairs we need to along the way.